Smart Whip

img_0458

img_5611

img_0503

img_0502

Happy belated Valentine’s Day! When you’ve been married for 29½ years, February 14 is not a huge deal…but I had plans for a romantic, cozy afternoon and evening at home with my sweetie. And a special post for you. But, instead, I spent a very long day in an airport.

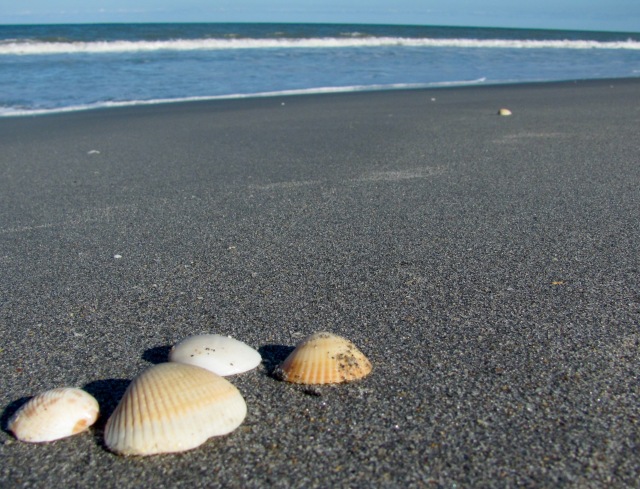
I went to visit my family in West Palm Beach, Florida for a few days last week. My sister and her family have lived down there for many years, and my parents have become snowbirds. My flight south was pleasant and uneventful and it was great to spend time with everyone. We went to my favorite beach on Hobe Sound and a took a wonderful kayak trip on the Loxahatchee River. Wendy and I are sisters and best friends; we love to walk and talk, our conversation punctuated by bird and turtle sightings.

My flight home was supposed to take off at 12:30 pm Sunday. I won’t bore you with the details, but there were massive delays having something to do with the cold weather up here in NY. And because the lags were announced one hour at a time, I stayed in the airport, hoping to leave, and wound up there for 11 hours! I managed to stay occupied and to make new friends, and the best of a frustrating situation, unlike a noteworthy hysterical few of my fellow passengers.

So, this post is, like my airplane, delayed. I finally got home at 3 am Monday, and up at dawn to start a busy work week in the dr deb office. So today is the first day I’m able to sit down to polish and post your Valentine’s treat. But, it’s a lovely treat any day of the year and I know you’ll love it. The kids will love it, too!

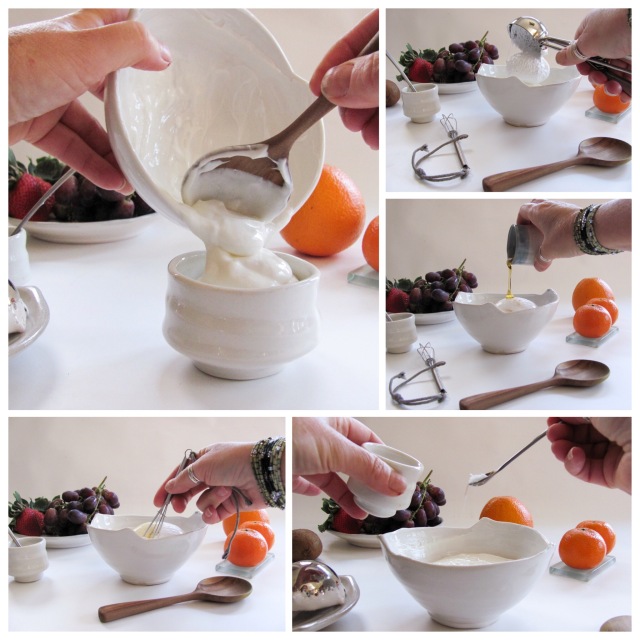
The idea for this sweet dip comes from my sister. She and her daughter, Tal, are like me, healthy eaters. We make most everything from scratch, and tend to look for natural and leaner ingredients. So I was surprised to hear that they’ve been fans of marshmallow fluff. I don’t think I’d ever bought the stuff. I’ve made homemade marshmallows, but I thought fluff was full of chemicals. It turns out that it’s mostly made out of eggs and sugar, much simpler ingredients than I’d expected. My niece eats it with a spoon and Wendy mixes it into blended cottage cheese, yogurt, or smoothies. I went right ahead and experimented with adding it to my favorite Greek yogurt, hoping to create a creamy dip that was lighter and fluffier than yogurt alone.

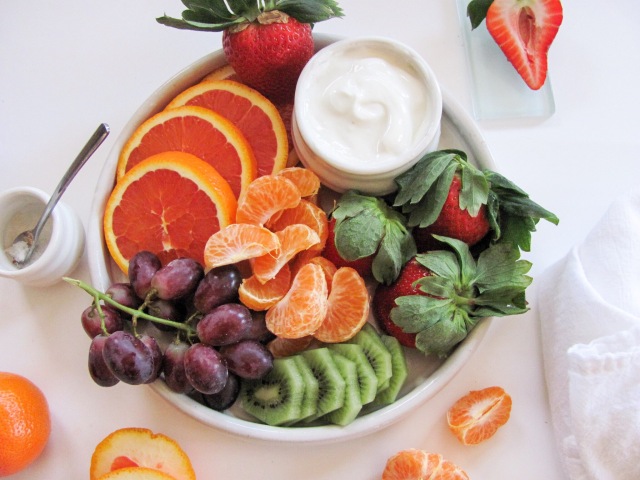
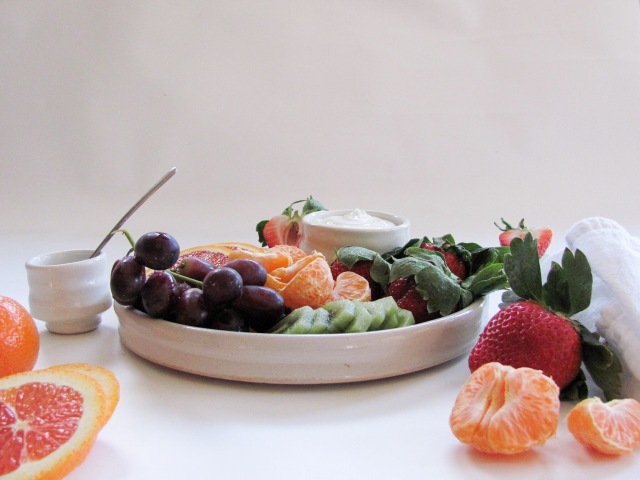
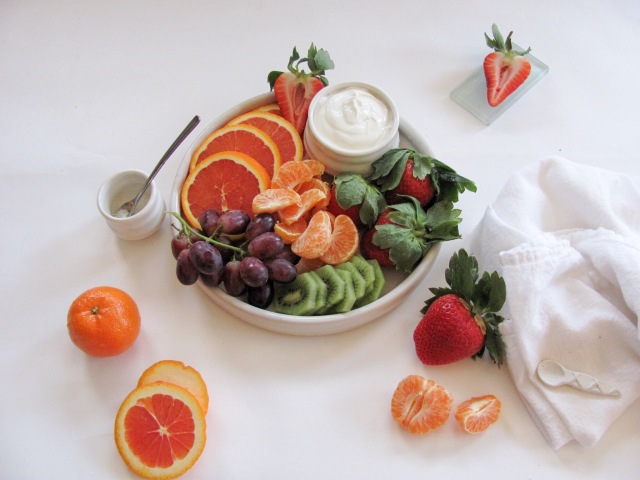
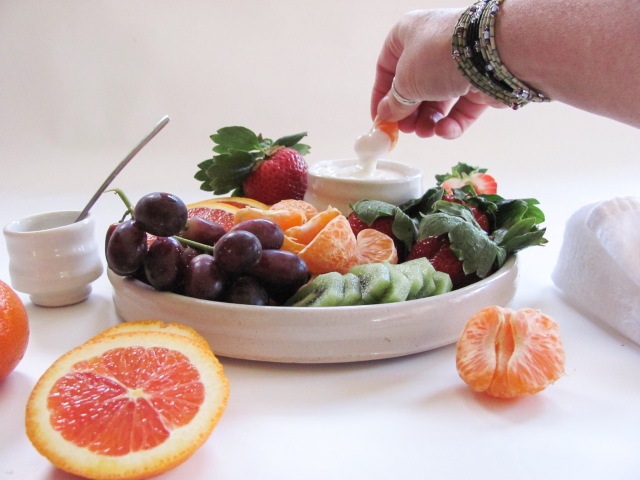
The result was exactly what I’d hoped. With the addition of a bit of extra sweetener and some vanilla, it is slightly tangy, sweet, creamy, smooth, light, pillowy, and luxurious. This is a perfect dip or topping for fruit, scones, pound cake, Banana Bread, pancakes, or waffles. It’s delicious, low in fat and calories, and fluffy. It’s whipped. It’s smart, it’s SmartWhip!

img_0510

img_0509

img_0501

img_0507

SmartWhip

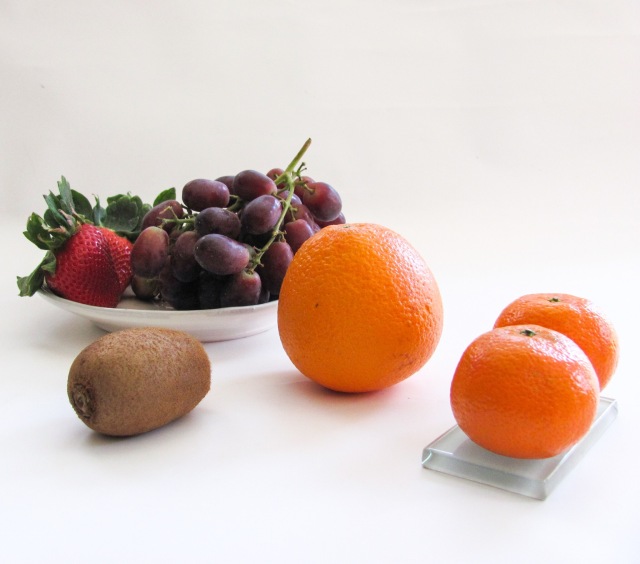
This makes enough dip for two lovers to share alongside a beautiful plate of fruit. Multiplies easily.

½ cup Greek yogurt (I use Fage 2%, but any Greek yogurt will work here)
¼ cup marshmallow fluff
agave or honey, to taste
vanilla powder or extract, to taste
tiny pinch salt

Mix all ingredients with a whisk or combine in a blender or food processor. Serve or chill for later.

Variations: Add a teaspoonful of cocoa powder and a dash of extra sweetener for a fabulous chocolate version. Stir in some peanut butter, peanut powder or other nut butter. Go for a drop of coconut milk and a drip of coconut extract to make it coconutty.

Enjoy in good health, with all my love!!

img_0500

img_0506

img_0498

Posted in dessert, dressing, entertaining, gluten free, healthy, kid friendly, low carb, lunch, simple recipes, snack, snacks, treat, treats, Uncategorized, vegetarian, workout | Tagged , , , , , , , | 8 Comments

Banana Caramel Upside Down Cookie Tart

img_0417

img_0409

banana tart


img_0431

Hawaii. Sigh…It’s really wintry here and I’ve been thinking about Hawaii. When I think about Hawaii, thoughts of bananas are not far behind. So, as a result, I have a major kickass banana treat for you this week.

Perhaps some explanation is in order. Two relevant pieces of information: 1. Bob and I will be celebrating both our 30th wedding anniversary and his 60th birthday this summer and we’ve decided to plan a trip to Kauai. 2. The last time we were there, I fell in love with bananas. Not just any bananas, Apple Bananas (also called Latundan or Manzana). These fat little cultivars grow in Southeast Asia and the Philippines and Hawaii, and are not shipped to the mainland US (sob, sob, sob).

On Kauai, apple bananas grow wild and are sold in farm markets and roadside stands. I went a little crazy (who am I kidding, it wasn’t just a little) buying and eating all manner of tropical fruit while we were on the island with Brian and his roommate two years ago. And then I tried to smuggle some of my new banana friends home. You’d think I’d have learned from the peanut butter smuggling incident on Maui several years earlier, but that is a story for another day. Needless to say, my considerable charm is historically wasted on Hawaiian TSA agents, and my attempts at small scale importing have been massively unsuccessful.

So, in celebration of our plans to return to the scene of a thwarted crime, I baked this tart (a fun and truly delicious twist on Tarte Tatin) with locally available Cavendish bananas (and yes, I do feel guilty for eating imported fruit…but have mercy, it’s February in New York). This is a variation on a recipe I’ve been developing using apples, and pears. It is great with all the fruit I’ve tried thus far, so feel free to experiment (and then leave me a comment). The cookie crust is just right, soft, a bit chewy, caramelly. Wait until you smell the heavenly aroma in the kitchen when this is baking!

The tart is perfect served warm with a scoop of homemade ice cream. Or any ice cream. Or very lightly whipped cream.

img_0423

img_0414

img_0422

img_0424

image.jpeg

Banana Caramel Upside Down Cookie Tart

Serves 4

A word about bananas: The supermarket specimens you see in this post are organic. Bananas are not members of the “dirty dozen,”  nor the “clean 15.” I tend to buy organic because I like to support organic growing practices when I am able. Do what feels right for you and your family.

The fruit I used for this post were riper than I would have liked for this particular recipe. In general, very ripe bananas are preferable for baking, but this recipe calls for cooking them twice. So, if you have the option to choose yellow, but less spotty ones, go for it. The tart will be prettier and more complex tasting. And if you can get Apple Bananas, make it with them; I am so jealous!!!

3 bananas, peeled and sliced crosswise, about ½ inch thick
1 cup organic cane sugar, divided
1 ½ cups all purpose flour
¾ tsp. baking powder
1 tsp. salt, divided
10 tbs. butter (1 stick plus 2 tbs.), cool room temperature
1 egg, room temperature
1 tsp. vanilla extract

optional: flaky sea salt for finishing.

Preheat oven to 375°.

Make the cookie dough: Mix flour, ¾ cup sugar, baking powder, and ½ tsp. salt in a medium bowl.

In the bowl of a stand mixer (or a large mixing bowl if you want to mix by hand or with a hand mixer), combine the stick of butter (8 tbs.) and ¾ cup sugar. Mix on medium high speed until well combined. Add the egg and vanilla, and mix well, stopping once to scrape the bowl. Add the flour mixture, and mix on low speed until just combined. Shape the dough into a ball, flatten slightly, and place in the fridge while you work with the bananas.

Melt the remaining 2 tbs. butter in a 8 inch cast iron skillet. Add the remaining ¼ cup sugar and cook until the sugar is melted and bubbly. Place the banana slices in the pan and cook over medium heat until you see that the sugar/butter mixture is beginning to turn amber around the edges of the bananas. This will take 3-5 minutes. Remove the pan from the burner. Sprinkle with remaining 1/4 tsp. salt.

Take the dough from the fridge and place on a piece of parchment. Using your hand, press the dough into a round that is 8 inches in diameter (see photo). Invert, the parchment over the bananas and peel away the paper. Carefully (don’t burn yourself), tuck in the edges of the dough. Slide the pan into the oven and bake for 20-25 minutes, until the dough is golden brown and slightly puffed.

Run a paring knife around the edge and place a serving plate on top of the pan. Using an oven mitt or pot holder, swiftly and confidently invert the pan and plate together so the tart flips onto the plate. Use a small silicone spatula or offset spatula to replace and smooth any unruly pieces of banana or caramel. Top with flaky sea salt if you like.

Serve warm with barely sweet, lightly whipped cream or ice cream.

banamiracle

bananafana

img_0427

img_0430

bananaperf

banananana


Posted in baked, baked goods, baking, dessert, fruit, kid friendly, snack, sweets, treat, treats, Uncategorized, vegetarian | Tagged , , , , , , , , , , , , | 4 Comments

Warm Brussels Sprout and Sweet Potato Salad

img_0376

img_0377


img_0383

img_0382

Have you ever noticed that there are some people who always seem to know the inside story? Yeah, well, I’m usually not one of them. But I got the scoop on the Brussels sprout situation in Washington DC during the epic blizzard of 2016!

The sources of this vital information were my son and my niece. Brian lives in Chinatown and Erin’s apartment is across the street from the Pentagon. Each attempted to acquire a supply of their beloved vegetable in preparation for the storm, and both were unsuccessful. I was worried! Clearly, Jonas had taken a toll on the Brussel’s sprout loving population in the mid-Atlantic even before the first flake fell. I am relieved to report, they ate well nonetheless (there was mention of steak and broccoli), and the blizzard passed without further vegetal incident.

After things returned to normal in our nation’s capital, I noticed an unusual sight in my local supermarket here in New York: Brussels sprouts on the stalk! This seemed unusual to me at this time of year; I generally buy them that way only in fall at the farmer’s market.

Also making a appearance at the store this week were my favorite infant Japanese sweet potatoes, in both red and white skins. I love sweet potatoes and Brussels sprouts together and immediately remembered making a delicious salad featurning them last year. Recreating it here confirmed my recollection of a winning combination.

bingred

img_0394

img_0384

img_0379

Warm Brussels Sprout and Sweet Potato Salad

This is naturally gluten free and low in carbs. Leave out the cheese and it’s vegan and paleo.

I use organic ingredients when I can find them. For this version, I used baby sweet potatoes, but any sweet potatoes work just as well. And feel free to vary the nut, fruit, dried fruit, and type of cheese to suit your taste.

Serves 4-6

1 lb. Brussels sprouts, trimmed and halved
1 lbs. sweet potato, sliced or cubed (about 1 medium-large potato)
2 small mandarin oranges
1/3 cup toasted walnuts
1/3 cup dried cherries
¼ cup crumbled Roquefort
2 tbs. walnut oil
3 tbs. balsamic vinegar or balsamic glaze
salt and pepper

Preheat the oven to 400°. Place the sprouts and potatoes on a baking sheet lined with parchment. Toss with the olive oil, salt and pepper. Roast for 20-25 minutes or until the sweet potatoes feel tender when you poke them with a knife.

Place the vegetables in a bowl and toss with all but 1 tsp of the vinegar. Add walnuts, cherries, and cheese. Drizzle with remaining vinegar. Serve warm or at room temperature. You may refrigerate and serve cold, but the flavors will not be quite as good.

Variations:
almonds, dates, pear, and parm shards
pistachios, dried apricots, cara cara orange, and soft goat cheese
cashews, dried figs, apple, and smoked mozzarella

img_0385

img_0387

img_0386

Posted in appetizer, gluten free, healthy, holiday, low carb, lunch, pottery, roasted, salad, side dish, side dishes, Uncategorized, vegetable | Tagged , , , , , , , | 4 Comments

Cauliflower Cheese Breads

img_0311

img_0273

img_0299


bright cheese bread

Before I started this blog, my intention was to take a few pictures and write down my favorite recipes to share with my twentysomething kids and some friends. Loved ones have been asking me for cooking ideas and instructions for many years and it always makes me happy to talk and think about food. Arranging food in my own pottery has been pleasure since I made my first bowl…and I knew that making images of my food in my pots is a special kick. I had no aspirations beyond sharing my interests with people who were already in my life.

Little did I know that I would fall in love with…can we call it an art form? That creating the blog would change my day to day life and influence the very way that I think and the things I do every day. Among other aberrations, I rarely take a bite of food before arranging and photographing it first. Nor do the very patient people around me. Thank you, Bob McGrath.

Thinking about food and about making pots much of the time is not new. Developing recipes is not new, either. But thinking about quantifying, naming, and describing the food, relating to hashtags, rich pins, lighting, food styling, props, and HTML…who knew?

Thus was spent winter storm Jonas. The recipe I am sharing with you today is the result of an enormous amount of thinking, experimentation, and testing (thank you again, Bob). I am really, really proud of this one.

Here in the new kitchen in the woods, the blizzard was a cozy, fun day of cooking, playing with pots and food, and eating. In solidarity with Our Mother’s color scheme, I chose a white vegetable and white pottery.

img_0303

ridic

These versatile breads are gluten free. I learned about using tapioca flour in baked goods from Nigella Lawson. Her new cookbook includes an interesting recipe for Brazilian Cheese Bread. Tapioca flour is the starch in those puffy little gems. I’d been experimenting with gf broccoli and cauliflower breads and pizza crusts, and it occurred to me that tapioca flour might add the stretchy, chewy quality I was seeking. Bingo!!!

img_0312

img_0313

img_0317

caulflat

ccc

Cauliflower Cheese Breads

These can be made using either broccoli or cauliflower. They are great made into the little round or big round shapes you see pictured here. Or, make a single, big shape and cut into squares (or triangles) after baking. I haven’t tried it yet, but I’m sure it would make a great pizza crust!

These freeze well. Microwave to thaw and then crisp up in the oven or toaster.

1 cup fully cooked, cooled, pureed cauliflower*
1 egg
½ cup grated sharp cheddar
¼ cup finely grated parm
1 cup tapioca flour
salt and cayenne pepper, to taste

*the best cooking method is steaming, as you want the vegetable to be fairly dry.

Preheat the oven to 400°. Line a baking sheet with parchment.

Place all ingredients in the bowl of a food processor fitted with the steel blade and process until a smooth mass forms. I like to take a half tsp. of the mixture and microwave for 20 seconds or so to test for seasoning. Add salt and/or cayenne to adjust.

Place the mixture in a bowl and chill for at least an hour and up to a day; you want it to firm up and to hydrate the starch before you form the breads.

To make the little round breads, use a 1 tbs. scoop and place rounds on the parchment. Alternatively you can make any shape you like.

Bake until golden brown and puffed, about 25 minutes. Serve immediately.

img_0300

img_0309

whatever


hmmcaul

done


Posted in appetizer, baked, baked goods, baking, bread, dinner, easy, entertaining, gluten free, healthy, side, side dish, side dishes, snack, snacks, Uncategorized, vegetable, vegetarian, weeknight | Tagged , , , , , , , | 15 Comments

Miso Glazed Salmon Revelation

img_0222

img_0225

img_0232

foodsal

It’s a good thing I’m a psychologist. Because when I wake up at 3:30 am thinking about cooking fish, I can reassure myself that I’ve been assessed by a competent clinician and don’t need to worry that I’m losing what’s left of my mind.

I am well aware that this blogging endeavor has made my temporally inappropriate, obsessional, arguably frivolous thinking about food much worse. If only I could figure how to channel all this creative energy into keeping Donald Trump out of the White House or reversing global warming. Speaking of which, Brian said that if The Donald gets elected he will eat his shoe. Which was supposed to comfort me, but instead kept me awake trying to come up with a delicious recipe for Shoe Parmesan.

But this salmon recipe! I did spend many, many sleepless nights working on this one. It was a puzzle I knew I could solve: every salmon cook’s quest for tender, silky, buttery, flavorful flesh and shatteringly crisp skin. The folks at ATK and Serious Eats have come very close; their recipes are excellent and I make them often. But…I wanted terrific flavor and greater extremes in texture and I knew it was possible.

And then it came to me: Cook the filet separately from the skin! This revelation was inspired by sushi-the wonderful Salmon Skin Hand Roll. When you cook skin that is not backed by flesh, both sides can become crisp. Removing the skin allows the fish to be marinated without the skin getting sogged out in the process; and this miso marinade (based on one from CI), is nuanced and perfectly balanced.

I am so delighted to share the results of my revelation with you; I know you’re going to love it. Please leave me a comment here or post a picture on Instagram and tag me when you make it!

img_0221

img_0238

img_0237

Miso Glazed Salmon Revelation

This recipe serves 2, but multiplies easily.

1 pound center cut salmon filet
¼ cup white miso
2 tbs. organic cane sugar
3 tbs. white wine or sake
salt to taste
drizzle of neutral oil or oil spray

Cut the salmon into two portions and then remove the skin from each piece. Place the skin flesh side up on a paper towel lined plate and refrigerate.

Whisk the remaining ingredients in a bowl until a smooth paste forms. Place the fish in a shallow container and rub with the paste, coating all the surfaces. Refrigerate for at least 6 and up to 24 hours.

Preheat the oven to 425°. Line a sheet pan with parchment and spray or rub with a bit of oil. Season both sides of the salmon skin with salt and place flesh side down on one side of the parchment (leaving room for the fish). Bake for 10 minutes.

Now, turn the oven down to 250°. Scrape most of the marinade off the fish and place on the other side of the parchment. Bake for 12 minutes. The salmon should be barely cooked in the center. If you like it cooked through, give it an extra minute.

Serve the salmon immediately, topped with the crispy skin, accompanied by lemon wedges.

Natural accompaniments are roasted veggies, done while the oven heats and the skin cooks. Here, I’ve done red cabbage, carrots, and white sweet potatoes. Brussels sprouts, green beans, fennel, and/or asparagus would all be wonderful.

img_0242


img_0235

img_0236


Posted in fish, seafood, dinner, gluten free, healthy, main, main course, main courses, main dish, Uncategorized | Tagged , , , , , , , , , , , | 16 Comments

Psychedelic Veggie Soup


img_0515

img_0603


gawkersoup

img_0182

It was a perfect place for a teenage party: green shag carpet, a white formica bar with an electric burner, a “conversation pit” with a brick fireplace, and a “record player.” In the early 1970’s, we had “albums” and “singles,” we smoked “pot,” and the hot pink, neon orange, red, and green wallpaper in the bathroom was “psychedelic.”

But…I wasn’t really popular enough to throw parties. I think my parents were actually disappointed. I spent my time in that basement dipping long pieces of string into scented liquid wax to make tapered candles, listening to Bookends and Dark Side of the Moon.

I remember those long solitary hours, lost in creative concentration, focused on my task, absorbed, relaxed, energized, fully alive. Revisiting those moments in a recent interview for 5 questions for the artist, I realize that I fell in love with the flow state. Today, I structure my life to provide space to create the same sort of experience more than 40 years later.

So, last week, when Bob left for a trip “across the pond,” to present his research at Oxford, I planned a sort of artist retreat for myself. I often do this when he is away. I made a big pot of my favorite soup so that I could warm bowls of it for meals for the four days he was away. I thought I’d run in the morning and then spend all my time in the studio making porcelain spoons, bowls and plates, coming out only to eat and sleep.

As it turned out, I was glad I had made the soup, but my retreat was sort of compromised. I wound up with some sort of dreadful respiratory infection, which destroyed my comfort, energy, motivation, and most of my good will. I did make a few pots, but mostly stayed on the couch with Sadie, reading, eating soup, keeping warm, and coughing. A different kind of retreat…

So, in honor of the colors of my psychedelic youth, I share with you the recipe for my soup.

img_0140

img_4897

img_0167

img_0181

Psychedelic Veggie Soup

I like the veggies in really big slices and chunks, so this is almost a stew. But if you prefer, you can cut them smaller.

Paleo folks, leave out the lentils. You might consider the partial puree variation; it will provide extra body to the soup.

1 tbs. neutral oil, I like walnut
1 large onion, peeled and sliced
1 head cabbage, shredded (I like savoy)
1 carrot, sliced
1 large parsnip, sliced
1 small rutabaga or medium turnip, peeled, and diced
1 sweet potato, peeled and diced
1/3 cup puy lentils
10 oz. mushrooms, sliced (I used cremini and shiitake here) or broken into pieces
1 box frozen artichoke hearts
½ bunch dill, cleaned
1/3 cup white wine
1 28 oz. can diced tomatoes (I like Muir Glen)
1 quart stock (chicken or veg)

optional: add a parm rind with the tomatoes.

Choose a very big pot or dutch oven. Heat the oil over high heat and add the onion. Get that warmed up and then throw in the cabbage. Let each ingredient brown just a little before you add the next, up to but not including mushrooms. After the lentils are warmed up, add the wine, then the tomatoes and stock. Cover the pot and bring to a boil. Add the dill, reduce the heat so the liquid is simmering, and cover the pot. Cook for 10 minutes.

Now, add the mushrooms and artichoke hearts. Cook for another 10-20 minutes or until the vegetables and lentils are cooked through but not falling apart.

foodpsy

All sorts of serving ideas:

Puree all or part of the soup with a stick blender or machine of choice (see photos).
Add a fried or poached egg to each serving.
Add some leftover or freshly cooked meat, poultry, shrimp, fish, or tofu for extra protein.
Top with Crunchy Bits.
Top with grated parm.
Use bone broth to add additional flavor and nutrients.
Use other herbs like parsley or cilantro instead of or in addition to the dill.
Skip the turnip or rutabaga if you are afraid of them (Mary and Martin).

I love to hear from you. Leave me a comment. Let me know how you like it!!

img_4907

img_4926

Posted in easy, entree, gluten free, healthy, low carb, lunch, main, main course, main courses, main dish, paleo, pottery, simple recipes, soup, supper, supper, main courses, Uncategorized, vegan, vegetable, vegetarian | Tagged , , , , , , , , | 4 Comments

Crunchy Bits

img_0062

img_0134

img_0103


crun

Happy 2016!!!

I was so excited to get this recipe to you, but it took longer than I expected to put together the post. I had to stop every few minutes to stand on my head. That’s what I do when I have a cold. It really helps me to feel better, but I still haven’t figured out how to edit photos upside down!

My salads have been getting a lot of social media attention lately. Since you have all been so generous, I decided to share one of my little secrets for a kickass topping. For other ideas and suggestions, check out How to Make a Really Great Salad on Chickpea and Rutabaga.

A couple of years ago, I discovered that nuts toast really well in the microwave. And you are less likely to get distracted and burn them than if you toast them in the oven or on the stove. It didn’t take long for me to wonder how the nuts would taste if you melted some cheese on them…great, but a little greasy. So, I tried adding some crumbs. I like to keep crispy panko crumbs in the house, but I’ve tried this with my own homemade crumbs, too. And they are great with gluten free crumbs.

These are so easy to make and so delicious, I’m sure you will come up with endless variations of your own! They are great on just about any salad, or on steamed, braised, or roasted veggies. Or soup. Or stew. Just don’t leave them out on the counter while you make supper!

img_0123

img_0124

img_0135

img_0125

img_0138

Crunchy Bits

Bob is at a conference at Oxford and I just got finished Facetiming with him. Forgive me for my lame attempt at a mildly inappropriate British sounding name.

This recipe makes enough bits to top 4-6 individual portions of salad.

Feel free to try this with different combinations of cheeses and nuts. I’ve used cheddar, gruyere, asiago, pistachios, almonds, pecans. Have fun!

1/3 cup finely grated parmesan cheese
1/3 cup walnut pieces
1/3 cup bread crumbs or panko (gluten free work fine)
vegetable or coconut oil spray

Mix all the ingredients except the oil spray in a bowl large enough to hold everything and mix without a huge mess.

Spray a sandwich plate liberally with the oil spray. Place the cheese-nut-crumb mixture on the plate in an even layer.

Place the plate in the microwave and cook on high for a minute. Check for doneness. It’s ready when the cheese is melted and there are some browned spots. If not done, continue to cook in 15 second intervals as needed.

Let the nutty, cheesy mass cool for at least 10 minutes and then break up into irregular pieces. Try not to eat them all before topping your salad, soup, stew, or veggies. Enjoy!!!

img_0137

img_0126


Posted in appetizer, gluten free, healthy, salad, simple recipes, snack, soup, Uncategorized, vegetarian | Tagged , , , , , , , , , , , , , , | 8 Comments

Carrot and Fennel Salad

img_0012

img_0017

img_0042

We all love to hate on New Year’s resolutions. We all make them. I know some people who say they don’t, but I suspect they are lying. We hate them because they are hard to keep. If they were easy we wouldn’t need to make them.

My friend, Minna, wrote a good blog post about this, she makes some terrific suggestions.

There are lots of reasons that resolutions are hard to keep and that many (maybe most) will fail. The primary reasons have nothing to do with lack of motivation or laziness or the fact that January is the worst possible time to try to accomplish stuff (we should all be sleeping, like bears).

We are wired to pay attention to novelty; built to hunt and gather while scanning for danger: a bear that’s awake even though it’s January…Resolutions are novel when we first make them, but they become old very quickly. And we lose focus. Which means it’s easy to make resolutions, but hard to maintain them.

My dear friend and colleague, psychologist and life coach, Ruth Landstrom, says that mindfulness is key to maintaining our progress towards goals. She points out that we tend to set grand, unattainable goals and then get discouraged and quit when we fail. So, break down goals into small steps… yeah, that’s good. Now go even smaller.

The most important thing to remember is that it’s in our nature to revert to old habits. So, mindfulness and self-compassion are essential. Expect to fail; plan to have to reset the intention regularly. Keep the awareness that change is difficult and be kind to yourself. As Ruth says, keeping a resolution involves doing things when we’re not inspired. Get back to the plan. Again. And again. It’s boring. It’s unglamorous. It’s change.

According to Statistics Brain Research Institute (I know, right?), “lose weight” is the most popular New Year’s Resolution. Makes sense, we all just splurged during the previous month. And it’s winter…

Even those of us who don’t want to lose weight should be eating SOME healthy food. It is less easy this time of year than in August when everything is fresh and bountiful. Here comes dr deb to the rescue! This one is healthy, vegan, gluten free, colorful, fresh, and absolutely yummy. Just like my Red Cabbage Salad, this is one I eat standing up in front of the fridge. It’s a little sweet, has a nice tang, crunchy, bright, and substantial.

This is a nice snack or lunch, straight up. It makes a perfect bed for a piece of asian or potato chip salmon, goes great with crispy chicken. Serve it with a fried or scrambled egg or with some hummus or hummole and pita or Star Bread. Since it improves for a few days, it’s great for packing a lunch or taking to a party or potluck.

img_0046

Before I share the recipe, let me tell you my New Year’s Resolutions. I intend to continue to bring you wonderful recipes like this one, mostly healthy, with some occasional treats. I hope you will follow DebsPotsBlog so you never miss a post and I’d love it if you’d leave me a comment to let me know what you think or what you’d like me to post. I’m also hoping to get the on line store up and running some time this spring, so stay tuned!

img_0051

img_0050

img_0039

img_0049

img_0048

cara

Carrot and Fennel Salad

One of the things I like best about this salad is that you don’t need really beautiful produce. Here’s a dirty little secret: I love to buy those huge horse carrots they sell at produce markets. I always think they’re going to taste fine. I’m attracted to the abundance; but they are pretty lousy. Winter’s tired carrots and marginal fennel are fine here. The dressing brightens them up nicely.

2 lbs. carrots, peeled
1 large fennel bulb, trimmed
1 scallion, trimmed and sliced
1/3 cup slivered almonds, toasted lightly
1/3 cup golden raisins
juice of half an orange
¼ cup honey
¼ cup rice wine vinegar
3 tbs. almond, walnut, or olive oil
salt and pepper

optional: cilantro, minced

variations: feel free to use walnuts or pistachios instead of the almonds. dark raisins, minced dried apricots, dried cherries or cranberries are good substitutes for the golden raisins.

Grate the carrots. The medium disk on a food processor is perfect for this, but a box grater works fine and gives you a good workout. Make sure to switch hands halfway through. Cut the fennel bulb in half and then slice very thinly; the food processor slicing blade is good. Or practice your knife skills.

Make the dressing: combine the orange juice, vinegar, honey, oil, salt and pepper in a bowl and whisk.

Pile the carrots, fennel, scallions, cilantro (if using), raisins, and almonds in a large bowl, add the dressing, and toss well. Serve immediately or refrigerate and keep up to 5 days.

Happy New Year!!!

img_0041

img_0043

carrot pornyporn

carrotporn

Posted in dressing, easy, entertaining, gluten free, healthy, low carb, lunch, paleo, salad, side, side dish, side dishes, simple recipes, snack, snacks, Uncategorized, vegan, vegetable, vegetarian, workout | Tagged , , , | 12 Comments

Cranberry Sauce Variations

trees

sunset

IMG_4465

rc

Happy Holidays!!! I know you’re busy, so no chatting today. Let’s get down to the reason we’re all here, to get new ideas for delicious things to eat. There is no time that is more important than now, right?

I feel it is important to eat cranberry sauce whenever possible, especially around holiday time. Cranberry sauce is an amazing resource. Make one, two, or all three of these variations and you will have a wealth of culinary options heretofore unimagined. Unexpected guests? No problem, you have cranberry sauce! Feeling peckish? Read on!

So, without further delay, I’m going to give you the recipe(s). And then, I will provide 25+ ideas for what to do with your Cranberry Sauce. As Brian used to say, “Don’t say I never gave you anything”!

craningred

grid

IMG_4451

IMG_4475

cc

Cranberry Sauce Variations

Vary the amount of sugar depending on how sweet you like your cran sauce; if you like it tart, use the lower amount. You can’t really get away with less than ¾ cup unless you like it flat out sour.

Classic

Makes about 2 cups.

1 12 oz. bag cranberries, fresh or frozen
¾ to 1 cup sugar (you may use brown or white; I like organic cane)
¾ cup water
pinch salt

Rinse the cranberries and pick them over, throwing away any that are funky looking or soft. Place all ingredients in a medium saucepan and bring to boil over high heat. Adjust heat to a spirited simmer and stir occasionally until the cranberries start to pop. Cook for another 5 minutes or so. Don’t worry, the sauce will be very runny at this point, but it will set up as it cools. Serve as is or make one or both of the variations.

I love warm cranberry sauce, and it’s also great cold or room temp. Make sure you chill it in the fridge within two hours of making it and it will keep, refrigerated, for up to two weeks. You can freeze it indefinitely.

Orange-Sesame

Add the juice and zest of an orange and ¼ cup sesame seeds. If you like a stronger sesame flavor, drizzle in a smidge of toasted sesame oil; be careful, it is very strongly flavored.

Ginger-Lime

Add the zest and juice of a lime and 1 tsp. grated fresh ginger.

The Ideas

25 ideas for how to use your cranberry sauce (you may use any of the three variations here):

-spread on top of a wheel of Brie, sprinkle with sliced almonds and bake until cheese is soft
-layer with Greek yogurt and granola for a beautiful parfait
-top a cheesecake
-use as a base for a barbecue sauce; add ketchup, vinegar, worcestershire, and soy sauce
-layer in a wrap with sliced turkey and swiss
-mix with mayo for the prettiest condiment ever; good for sandwiches, roasted veggies, fries, fritters, Crispy Chicken, Zucchini Fries, or latkes
-make a smoothie with yogurt and honey
-use to top your overnight oats or oatmeal
-topping for pancakes or waffles
-swirl into a pound cake or muffin batter.
-serve with baked pork chops (see picture)
-top an English muffin with goat cheese and cran sauce (see picture)
-use as a base for salad dressing; add mustard, oil and vinegar
-mix into chicken or turkey salad
-serve with sautéed duck breast
-mix with chia seeds to make cranberry chia jam
-top a panna cotta
-spread Mindfulness Bread with cream cheese and cran sauce
-add to cheddar and good bread for the best grilled cheese ever
-mix with mustard for a sweet/sour/sharp condiment for a sandwich or burger
-mix with sour cream and hot sauce for a chip dip
-mix with sriracha and/or mayo for a sauce to serve with grilled meat or poultry
-bake some chicken parts in a mixture of cran sauce and sliced onion or shallot
-make a frozen cranberry daiquiri-blend with rum and lime
-serve with swedish meatballs (see picture)

blem

IMG_4492

IMG_4520

IMG_4512

I bet these ideas will give you some of your own. Leave me a comment and let me know what you think!

Bob, Megan, Brian and I wish you and your family all the best during this holiday season!!

IMG_4473

IMG_4469

IMG_4459

Posted in appetizer, breakfast, chicken, condiment, dessert, dinner, dressing, easy, entertaining, entree, fruit, gluten free, healthy, holiday, lunch, main course, party, poultry, salad, sauce, snack, thanksgiving, vegan, vegetable | Tagged , , | 1 Comment

Star Bread

IMG_7078

IMG_7108


IMG_7114


pweese

They say that as we age we get “set in our ways.” I’ve never paid much attention to that because I don’t know who “they” is and I’ve never thought of myself as getting old. But as I was brushing flour off my hands at dawn this morning, it popped into my head that “they” are right. I’m getting set in my ways!

It was sixty degrees out yesterday and I got to run in a tank top! I love to run! I was running and singing at the top of my lungs, celebrating the warm wind on my arms. I know, global warming…but I decided not to think about that. The older I get, the more precious it is that my body still allows me this enormous pleasure.

I love making pots. And cooking. And taking pictures of pots and food. I have the most fun when I have the luxury of time to spend in the kitchen and the studio.

Perhaps the most delicious of all is baking, especially baking bread. If you think about it, baking bread is very similar to making pots. Dough shares a lot of qualities with clay-it’s moist, earthy, malleable, finicky, and heavy; both clay and bread dough are transformed by heat. To me, there is not much that is more fun than shaping something, popping it in an oven, and pulling it out in a different state of being!

So, developing this recipe was incredibly fun for me. And I can’t wait for you to try it. Even if you’re not experienced with clay or bread dough, it’s not that difficult.

This is a savory pull-apart bread. It is chewy and crusty and fun to eat. If you use plenty of salt, it tastes a bit like a pretzel. I sort of want to make one every day.

IMG_7107

IMG_7109

Before we get to the recipe, I want to share a bit of good news. If you’ve been following DebsPotsBlog, you know that my friend, Martin, has been batting leukemia since June. The treatment has been intense and difficult for him and his family. He is done with chemotherapy!!! His oncologist has said that she does not need to see him until April! It is time for him to build his strength in the hope that he will be able to return to work in February. So thank you for all your prayers and well wishes! And of course, a holiday donation to The Leukemia and Lymphoma Society would be greatly appreciated!

IMG_7110

breadhand

Star Bread

I am giving you a recipe for the dough, enough to make two stars. But if you only want to make one big star, you may use this recipe for the dough. Or use your favorite bread dough and make whatever size(s) you like. I like sourdough, so I decreased the water and yeast and added ½ cup of sourdough starter. You could even buy bread or pizza dough and have fun playing with the shaping.

This is vegan if you skip the cheese.

Makes two stars, one big and one smaller, or one simple round bread.**

You will need a small round cookie cutter or a cup or bowl, parchment paper, and a mister for spraying water.

2 cups bread flour
½ cup whole wheat flour
½ cup rye flour
1 tsp. active dry yeast
1 tbs cane sugar (optional)
1 tsp fine salt
1-1 ¼ cups room temp water (filtered if your tap water isn’t great)
1 tbs. oil
¼ cup sesame seeds (I used black)
½ cup grated parmesan (optional)
2 tbs. coarse salt (I used Hawaiian red)

Either by hand or in a stand mixer fitted with the dough hook, mix the flours, yeast, salt, and sugar. Add the water and mix until it comes together to make a pliable dough, adding more water as needed. Mix for 5 minutes or knead by hand until the dough is elastic, smooth and springy. Oil a big bowl, smoosh the dough around in the oil until coated, place the dough in the oiled bowl and cover with a towel; let rise at room temp for an hour.

Preheat the oven to 425°. Place a pizza stone or unrimmed baking sheet into the oven. Prepare two 12 x 12 inch pieces of parchment. Cut off 1/3 of the dough for the small star.

From here out I’m going to give you instructions to make one star; I recommend making the big one first and then moving on to the small one while the first begins to proof.

Cut the ball of dough into 4 equal pieces, forming each quarter into a ball and then flattening the ball to make a pancake. The dough will be resistant to stretching because you’ve been activating the gluten, so at this point, it’s a good idea to let the pancakes rest for 5-10 minutes. After the rest, begin stretching the pieces, alternating among the four, until you have rounds roughly 8 inches in diameter for the big star, 5 inches for the small.

Place the first round on the parchment, spray lightly with water, and sprinkle with sesame seeds, salt, and parm, if using. Repeat this process twice and then top with the fourth round of dough.

Now place your cookie cutter or cup in the center of the stack. Using a bench scraper or sharp knife, make sixteen even cuts through the stack, so you have what looks like the spokes of a wheel (check out the pictures). This will give you an 8 point star. If you want to make a 6 point star, make 12 cuts.

Now, take a pair of spokes, and twist outward, away from each other, twice. Bring the two ends together and pinch to seal. Continue around the circle repeating this process until you have formed the star. Sprinkle with additional seeds, salt and parm if you like. Now let the star proof at room temp for ½ hour or so.

Place the star (still on the parchment) on a pizza peel, unrimmed baking sheet, or the back of a rimmed baking sheet and spray the top with water. Use the peel or baking sheet to slide the parchment onto the stone or baking sheet in the oven. Spray 2-3 times with water during the first few minutes of baking.

Bake for 15-20 minutes, or until browned and puffy. Repeat with the second star. Let the stars cool for at least 20 minutes before you start tearing them apart and noshing. If you have any leftovers, reheat them in the oven or toaster oven before you eat them.

**To make a simple, round bread, follow the first paragraph of instructions, including 1/2 cup of fed or unfed sourdough starter. Fold the dough a few times, and let rise for another hour. Then form a round on a piece of parchment on a peel or unrimmed baking sheet while you preheat the oven to 450°. When the dough is doubled in size, spray with water, sprinkle on the toppings, and slash it several times with a sharp serrated knife. Slide into the oven on the parchment and bake for 10 minutes. Lower the heat to 350° and bake for 35 minutes more. Cool for at least 2 hours before serving.

IMG_7115


IMG_7112

sharpiebread

Posted in baked, baked goods, baking, bread, breakfast, ceramics, entertaining, holiday, snacks, Uncategorized | Tagged , , , | Leave a comment